Codfer
Site tracking is a key part for businesses wanting to use data effectively. HubSpot is a strong inbound marketing platform that offers tools to track visitors. It helps you understand their behaviors and make decisions based on data.
However, setting up HubSpot’s site tracking needs a good understanding of tracking code. You also need to manage domains and set up analytics properly.
In this guide, we will show you every step to set up site tracking in HubSpot. We will help you maximize the use of analytics features. This process includes installing the tracking code and managing your domains. You also need to ensure that your data is accurate.
Tracking involves gathering, evaluating, and analyzing data from website navigation. This information includes analytics like user counts, device types, and traffic sources. It also tracks session duration, bounce rates, and audience demographics.
Simply put, a code tags your URLs to get specific data from web pages. Tracking connects your marketing efforts to lead generation and performance. It helps evaluate actions in digital marketing and identifies top acquisition channels. This improves your marketing strategy by focusing on what works best.
Tracking is essential to your business because it shows which marketing efforts attract customers. It helps you find where your traffic and audience come from. Additionally, it shows which channels bring the most revenue. This helps you decide where to focus improvement efforts.
Tracking also gives insights into page performance, like high bounce rates and pages ready to convert. This lets you improve user experience by optimizing site navigation. Overall, tracking shows both your strengths and weaknesses. It helps you build a marketing plan focused on continuous growth.
Before you begin, make sure you meet the following requirements:
To get started with HubSpot tracking, you need to install the tracking code on your website. This code can be installed manually, or if you’re using CMS systems like WordPress, HubSpot provides plugins to make the process easier.
Log in to your HubSpot account and navigate to Settings.
In the left-hand menu, click Account Management > Tracking Code.
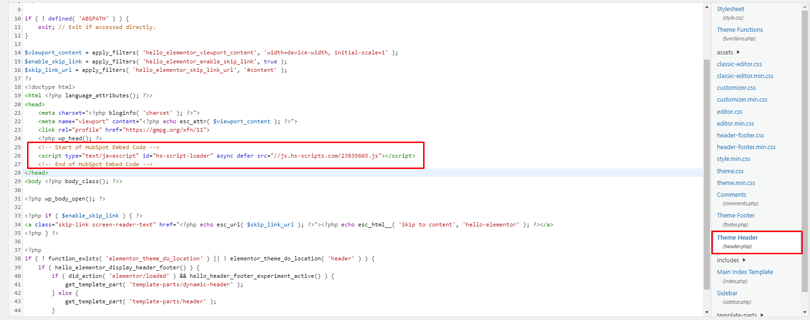
Click on Set up tracking by embedding code and Copy the tracking code provided.
Click on Paste this code into the header of your website, ensuring it is present on every page where you want to track user activity.
If your website is hosted externally and not connected to HubSpot, you will still need to install the tracking code manually. Without the tracking code, HubSpot cannot track traffic from those external pages.
Tracking is most effective when HubSpot is aware of all the domains and subdomains where your website operates. After installing the tracking code, it’s time to update your company domain settings within HubSpot.
This ensures that HubSpot crawls your primary domain and tracks all associated activities.
To track traffic across multiple domains, you must add each domain to your HubSpot settings:
HubSpot will now track all the domains and subdomains you specify. This gives you a complete view of visitor activity across your entire digital presence.
Cross-domain tracking merges visitor profiles across multiple domains. This allows you to see a full picture of how a single visitor interacts with your different websites.
Cross-domain linking allows HubSpot to see that visits come from the same person. Without this, visits to other domains may be labeled as Direct Traffic. This can skew your data and lead to inaccuracies.
This will allow HubSpot to track users as they move between different domains. It provides accurate data about where traffic is coming from.
Not all traffic is helpful for your analytics, especially internal traffic or bots that could distort your data.
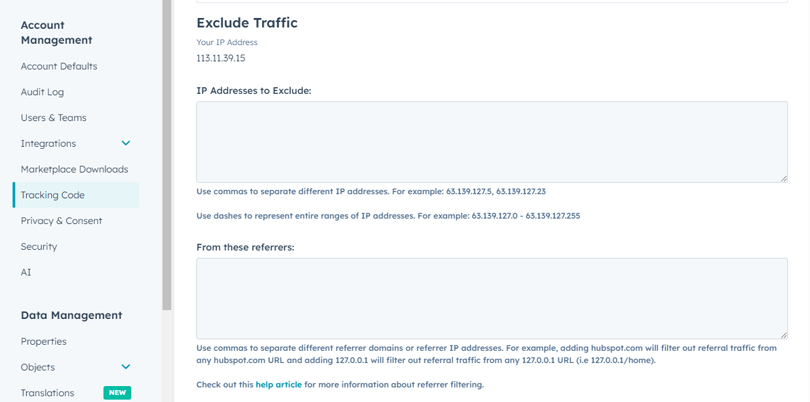
To prevent skewed data from your internal team visiting the website, you can filter out this traffic by IP address:
Bot traffic can also distort your analytics. Make sure you’ve enabled bot filtering in your HubSpot settings to keep your reports clean.
It’s crucial to ensure user consent for tracking, especially with increasing privacy regulations.
Implementing a consent banner ensures that you remain compliant with laws like GDPR, allowing users to opt in or out of tracking.
Sometimes, you might want to limit tracking to certain domains or subdomains.
To only track traffic from specific domains:
This ensures that only listed domains are included in your analytics.
You can also limit cookies to specific subdomains, which can be beneficial for tracking user behavior in a more granular way. Simply toggle the Limit Cookies to Subdomains switch in the same settings tab.
Secure cookies help to ensure data is only collected on pages that load over HTTPS, enhancing security.
This ensures that only secure pages will load cookies, adding a layer of data protection for users.
Implementing effective site tracking in HubSpot can give you useful insights into user behavior. This can enhance your marketing strategy. Here are some best practices to keep in mind:
Recognize Your Visitors: Using their IP addresses, you can determine your visitors’ geographical location. Focusing your marketing efforts on pertinent regions ensures better audience engagement.
Install the Tracking Code Properly: Ensure HubSpot’s tracking code is on all website pages for accurate data collection. Use HubSpot’s verification tool to confirm the correct installation and avoid missing visitor data.
Use Cross-Domain Tracking: Enable cross-domain tracking to track users across multiple domains seamlessly. This provides a unified view of visitor behavior across your connected websites.
Exclude Internal Traffic: In HubSpot, filter out internal traffic by excluding your company’s IP addresses. This ensures that your analytics data reflects genuine visitor interactions, not internal activity.
Recognize Your Visitors: Using their IP addresses, you can find out where your visitors are from. This helps you better engage your audience by focusing marketing efforts on relevant areas.
Implement a Consent Banner: Comply with privacy regulations by using HubSpot’s custom consent banner for tracking. Ensure visitors can easily opt-in or out of being tracked on your website.
Filter Out Bot Traffic: Activate bot filtering in HubSpot to prevent bots from skewing your data. This ensures your analytics accurately represent human visitors for better decision-making.
Regularly Monitor and Review Tracking Data: Periodically review your tracking data for any irregularities or issues affecting accuracy. Regular checks help ensure that tracking remains reliable and up-to-date.
Ensure the HubSpot tracking code is installed on all external pages. Then, add the external domains in the “Tracking Code” settings to include them in your reports. This helps capture accurate data across all connected external sites.
Verify cross-domain linking by reviewing the visitor data between multiple domains. Ensure URLs contain the necessary parameters (__hsfp, __hssc, __hstc) to track users across domains. This guarantees accurate data collection across all your websites.
Yes, subdomains can be tracked independently by configuring them in ” Advance Tracking” settings. Add each subdomain as a unique entry to ensure detailed, separate analytics for each part of your website.
Add your company’s IP addresses in HubSpot’s “IP Filtering” settings to exclude internal traffic. This ensures your reports reflect visitor data and aren’t skewed by internal activities.
Install HubSpot’s tracking code on the new domain and add it to the “Tracking Code” settings. This ensures that all new traffic is tracked, giving you consistent website data.
Site tracking in HubSpot is a strong tool for gaining insights about your website’s performance. By understanding visitor behavior, traffic sources, and engagement, you can enhance your marketing strategies. Cross-domain linking, secure cookies, and IP exclusions help keep your data accurate and trustworthy.
Setting up site tracking in HubSpot effectively helps you attract the right audience. It also improves the overall user experience on your site. By using HubSpot’s powerful tracking features, you can make data-driven decisions. This boosts conversions and drives growth for your business.